Contents
Compare Slit Planting VS Trench Planting
Slit Planting
|
Trench / Hole Planting
|
Slit Planting
- Easy and effective technique
- Widely used for farm hedges and for forestry planting
- Only works with bareroot plants graded 60-80cm tall or shorter
Larger plants with larger roots require trench planting, see below.
Slit planting can be done direct into markings in the soil, or for ease of maintenance you can plant through Mypex weed suppression fabric, as demonstrated in our Country Hedge Planting Film.
Installing the Mypex mulch fabric (Optional)
- Lay the Mypex along the line of the intended hedge. The fabric is just over 100cm wide and you only need a 40+ cm width for a single row of plants (60-70cm for a double row). You can cut it to width and peg it down if you want, but the following is much easier.
- Do not cut it to width just yet. Instead, standing on the Mypex and using an ordinary garden spade simply drive the spade into the soil, through the Mypex, down for about 2-3″. Mypex is very strong and tucks firmly into the slit made by the spade.
- Do this all along one edge and then back along the other trying to keep the fabric taut. More people standing on it, or two people working face to face with two spades make the job easier.
- Using a garden line to keep straight, cut slits across the fabric a little longer than your spade is wide. A single row is every 33cm, and a double row is two single rows 40cm apart, staggered or offset by 16.5cm into a zig-zag shape.
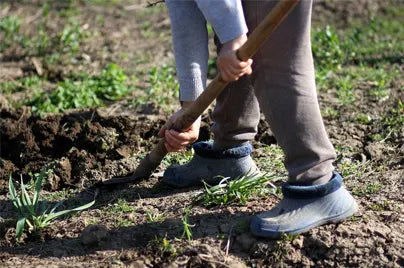
Slit planting technique
Have a bucket of water to hold the plants while you work.
- Put the spade through the first slit or marking and drive it down vertically to full depth. Push the spade handle forward, and pull it back, making a slot in the ground. Remove the spade. For a bigger slit: Cut at right angles to the first slit to make a T or L shaped notch.
- Take a sapling from the Rootgrow mixture or bucket of water and hold it above the ground with the roots over and along the line of the slot. Bring the sapling upright, “sweeping” the roots down into the slot in the same motion. Sweep the roots into the hole from one side without squashing them.
- Hold the plant at about the level it was growing before it was lifted, and firm the ground down around it with your bodyweight. The better the contact between earth and root, the better the plant will establish, so it should be hard to pull it out of the ground using just thumb and forefinger. Important: The root collars should finish at or slightly above soil level. Hold the stem so it doesn’t sink with the soil as you firm. It is a bad error to plant too deep as the bark on young plants can rot easily.
- Aim to end up with a bed that is slightly ridged: 2-3cm higher in the middle than at the edges. This helps water run away from the trunks, and the ridge itself will erode so the danger of rotting bark is minimised.
- Finish the row and water it thoroughly.
- Water really well in dry spells all through the first summer.
We show two alternative slit planting techniques in our post about growing hedges in grass turf.
Team planting for large projects
For efficiency on large hedging projects, work in teams of three:
- Person 1: Makes the slit
- Person 2: Sweeps roots into the slit
- Person 3: Firms soil back, checks the plant is at the right level
An amateur team should manage 500 plants a day, or 100 metres of double row hedging.
Trench Planting
This requires more work, but is necessary for larger bareroot plants, graded over 80cm, and pot grown plants over p9 size.
A good trench for a hedge is 60cm wide, but 45cm is acceptable, and a full spade’s depth.
See our Formal Garden Hedge Planting Film for a demonstration of trench planting, or our tree planting video for big holes for single plants.
- Remove grass, weeds, roots, large stones, and loosen the bottom of the trench with a garden fork to help drainage.
- Improve most soils by mixing in no more than 25% by volume of well-rotted manure or good garden compost.
- On heavy clay, add nothing: only break up soil compaction, then apply mulch later, after planting over the soil.
Ideally, do the above in advance, putting the soil back into the trench so it settles before planting (covering it with weed-proof fabric is most convenient).
- On planting day, keep your plants roots protected from wind in their plastic bags. As you need them, take out a bundle at a time, and put their roots directly into your bucket of Rootgrow or water.
- Use a garden line to keep your planting straight and dig a good sized hole every 33cm in your beautifully filled in trench.
- Take a sapling from the bucket, hold it vertically in the trench spreading out its roots so that as much root as possible is in contact with the soil. They should not curl back on themselves!
- Cut off damaged roots with secateurs.
- Check the “tide mark” on the trunk, where the soil level was before the sapling was lifted: it should be the same height in the new soil.
- Mound soil under the roots until you reach the right height. Planting too deeply is a common mistake with planting trees! Most bark rots quite easily, so planting shallow is better than planting deep.
- Backfill around the roots, firming the soil gently as you go to remove air pockets until the soil is at the level of the “tide mark”.
- Don’t damage the roots by stamping down too hard, but use your bodyweight firmly to make sure they are securely planted.
- Move on 33cm and repeat the process until all are planted.
- Return along the row treading down the soil so that the roots are well ensconced and check each plant is vertical.
- If you need more support against wind, use 90cm bamboo canes as “stakes”, tied low to the trunk of each plant with ordinary garden string. Pull the canes out the following autumn.
- Water well.
- Mulch around the plants and up to 45cm away with well rotted farm manure/compost; do not pile it up against the trunk.
Planting replacements in existing hedges
When putting replacements into existing hedging, cut a hole in the hedge and work over a section of soil, improving it with compost.
Filling gaps in existing hedges: Large replacements are best for big gaps, but small plants can slide into tough, root-filled soil. Inspect the ground well first—test getting a spade or pickaxe down along it.
Hedge Plant Protection
Rural locations usually need protection against rabbits and voles.
For hedge plants 60-80cm and under:
- Perforated spiral guards against rabbits and voles
- Bamboo canes to hold the spiral up with the young plant
For trees that you want to grow above the hedge:
- Tree guards (with stakes) protect against deer and prevent the tops being trimmed with the hedge
In our experience, deer repellents are effective until a hungry deer in winter braves them for a meal!


Leave a Reply