Table of Contents
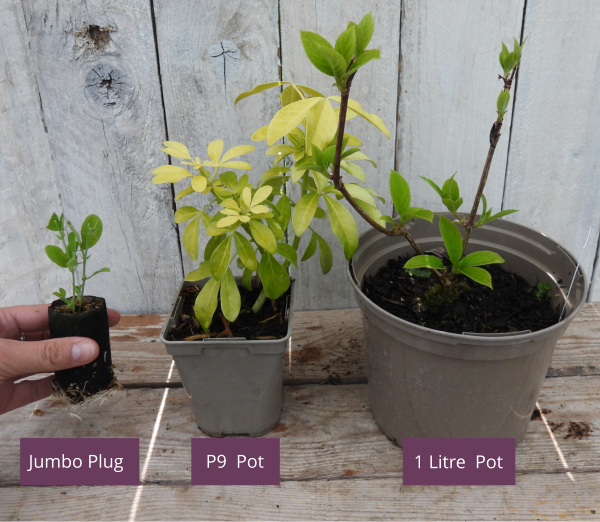
A P9 pot is 9cm wide at the top, containing about half a litre of soil
It would be clearer if P9s were called “half litre pots”, but the industry standard is to measure pots under 1 litre by their width in centimetres, rather than their volume in litres.
P9 is the smallest pot size you would typically buy any woody or perennial plant in, and the largest size you might buy an annual / biennial plant in.
Like most highly reputable suppliers, we deliver annual Cosmos and Sweet Peas seedlings in Jumbo Plugs, which are the best value for that type of plant.
What Almost No One Tells You About P9 Plants!
Experienced gardeners know that plants in P9 pots are great value if you are happy to wait one year before planting them outside in most cases.
Why?
The P9 plant is usually a cutting that only has about a year’s root development
It’s still recovering from the trauma of being cut from its original roots, and forced to grow new roots out of its leaf buds!
It’s not fully ready for the big bad world of soil life and weather out in your garden.
The best thing to do with a plant in a P9 pot is usually to pot it up into a 1-3 litre pot, and nurture it in a sheltered place for a growing season, or at least overwinter (evergreen plants in greenhouses should grow roots through the Winter), to beef up its root system before planting it out into the open soil.
To be clear: people successfully plant millions of P9 size plants out directly into the soil, and it works out fine.
- Potting up P9s for a season before planting them out is about preventing failures, and giving your little plants the best possible start.
- Planting P9s into patio containers of fresh compost obviously counts as potting them up.
- P9 plants grown from seed have a non-traumatised root system, so can often be planted out with decent results when their roots fill the P9 pot; the same is generally true of plants grown from rooted cuttings, as many herbaceous perennials are.
- An experienced gardener who knows the plants and their location will decide for themselves whether these guidelines apply.
For Best Results Planting P9 Pots: Pot them Up!
If you bought two of the same plant in P9 pots, you would have a bigger, stronger plant with better roots after a year on the one you potted up, compared to the one you planted out directly to garden topsoil.
Potting up tends to be most beneficial for skinny plants like climbing vines; a little clematis P9 has less wood than a pencil!
At the other end of the sensitivity scale, tough, scrubby shrubs like Lavender or Berberis do well as P9s planted into warm soil in May or June.
Lavender P9s Are Good to Plant Out In Spring
Lavender turns out to be one of those plants that performs well as a P9 planted out directly into warm soil in mid/late Spring.
Part of the reason is young Lavender should be trimmed to maintain low, bushy growth, which also reduces pressure on the establishing roots.
How to repot P9 plants quickly
It’s easier to pot a P9 plant up into a 2 or 3 litre pot, that’s what I do at home, but a 1 litre pot is adequate.
I prefer using a bigger pot and not filling it, rather than filling a smaller pot, unless I am short on growing space.
- Add some soil: Put some soil in the bottom of the new pot, enough so that you are still able to smush the old P9 pot down into it until its rim is at least an inch lower than the rim of the new pot
- Fill the sides with soil: Hold the P9 pot in place and tip potting soil all around it to fill in the sides. Excess soil lands in the P9 pot for easy removal, rather than going all over your plant as it would normally, and the plants leaves aren’t blocking the way
- Put the plant in the hole: Put the old P9 pot as the form to make a perfect sized cavity in the soil in the new pot. It may help if the new soil is damp. Rootgrow is recommended
- Top it up: Add a little more potting soil to fill in the tops of the sides, and so that all the old soil is covered with new
- Water it in
OK Thanks, But When is the Best Time to Plant out Plants in P9 Pots?
Spring is by far the “least risky” seasons for planting P9s out directly into the soil.
Late Summer / Early Autumn is usually also OK:
- Spring: After the last frost, when the soil has warmed to over 7-8C, is the safest time to plant P9s out directly.
They have time to establish before Summer heat, and even more time before Winter.
Tip: Consistent watering and weeding is essential, mulch is always beneficial - Summer: A mid-Summer heatwave is stressful on a new, small plant, especially if the top layer of soil dries out.
Tip: Shade cloth may be necessary for the hottest weeks, in addition to the watering, weeding, and mulch - Late Summer / Early Autumn: After the last heat wave of Summer, plants have time to establish some roots before Winter
- Late Autumn / Winter: The most likely time for failures. The roots sit in cold, wet soil for months with little to no ability to develop and adapt to its tougher surroundings. Plants that survive until Spring will be well behind plants that were potted up and kept in a sheltered place overwinter, and produce weaker growth that first growing season due to their smaller roots.
Tip: Protect from cold with a decent layer of mulch on the soil, and possibly fleece, straw, or bracken over the plant
Key Takeaways
Potting up P9s for a year increases survival rates, protecting these recent cuttings from weather and pests as they develop a new root system.
Although people successfully plant P9s directly into the garden, especially in Spring, new gardeners are advised to play it safe and pot them up.
P9 plants are cheap, and with a little extra work and attention at the start, they quickly develop into robust, full-sized specimens, indistinguishable within a few years from the same variety bought as larger sizes.
A Word From Ken Black on Clematis in P9 Pots
Here Ken Black of British Clematis Society fame shows the difference in root development between a P9 size Clematis he bought at a supermarket and a 2-3 Litre size plant.
We’ve skipped to the part where he compares the roots and talks about planting out P9s:
Plants differ in how strongly they strike new roots as a cutting, and Clematis is on the more sensitive side. Other plants, like Lavender, have good survival rates when planted out as P9s and so they typically are, but all P9 plants love being potted up and looked after before their final placement.
Are p9 pots worth it?
P9 pots are good value if you are in no hurry, and when planting conditions are ideal for planting them out directly.
For most garden scale projects, people prefer larger pot sizes to save a year or two of waiting around.